Bright Life is an upcoming 3D flora generation toolkit to allow indie game developers to create flourishing ecosystems instantly.
We’re going to build a AAA-quality wind simulation system in OpenGL.
Each game development studio has its unique approach with varying degrees of quality and complexity. Even a basic implementation of a wind simulation system can immediately elevate the realism of your virtual world, inspiring more immersive games.And since Bright Life is a 3D plant generator, having a wind simulation system is critical.
As always a massive thank you to everyone on Patreon keeping this project alive. Your support is truly invaluable and allows me to continue sharing these advanced game development techniques. There’s more on how you can support at the end, but for now, let’s begin.
The Wind of Horizon Zero Dawn
Wind simulation has undergone a remarkable evolution over the last two decades. But despite pushing the boundaries, modern techniques are still largely dependent on sine wave equations.
For this video, we’re drawing inspiration from the innovative work of Gilbert Sanders and his team at Guerrilla Games. While developing Horizon Zero Dawn, they created a simple yet powerful wind simulation system. And we’ll be adapting some of their techniques to our own.
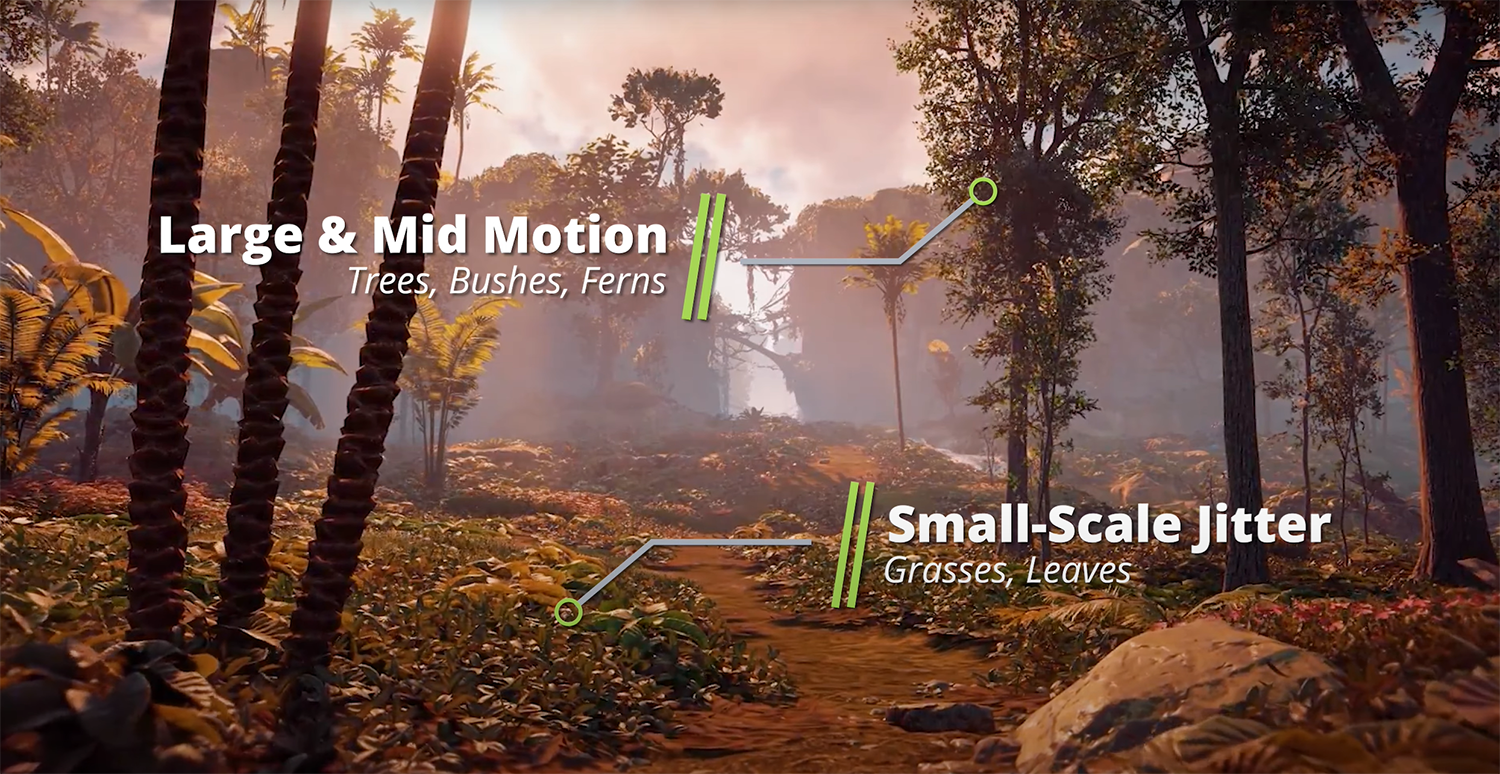
Instead of wasting time trying to create a single perfect magical formula, Sanders made a three-tiered layered simulation system. Each layer is responsible for a different part of the animation. One handles global large-scale motion, another more localised motion, and a final layer generates small-scale jitter.
The first two apply to almost every object interacting with the game’s wind system, but jitter only affects specific vegetation, such as grass and leaves. And once calculated, the output of each layer is combined and applied to a model’s vertices inside a geometry shader.

As modern techniques go, this is not the most advanced, yet it still creates undeniably impressive results. So, let’s try and build something similar. Don’t worry, it’s simpler than it sounds.
Calculating Large-Scale Motion
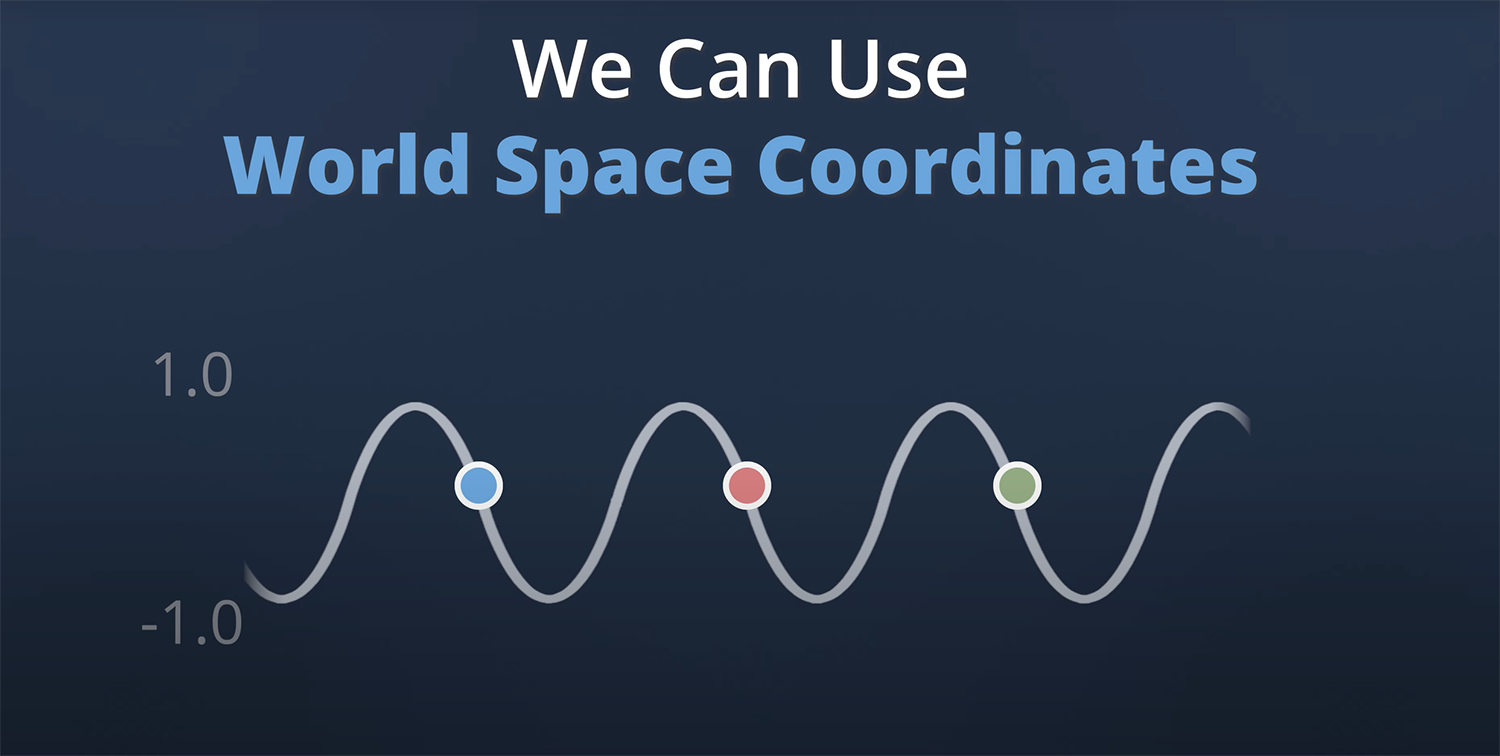
For our large-scale motion layer, we’re going to start with a traditional sine wave. Regardless of what we feed in as an X variable, the function will always return a value between -1 and 1. And by substituting in Elapsed Time, we can travel along the sine curve, creating an animated back-and-forth motion.
The problem is that this isn’t how wind behaves in real life. So, let’s make some adjustments. By using the same value for X across all vertices, we create an undesirable uniformity. To fix this, we want to change the X input so that each vertex moves independently from each other while still being driven by Elapsed Time.
Fortunately, each vertex has unique world space coordinates, which are the positions of the vertices in the game’s world. So, we can use these to create a unique Wind Factor. By dividing the sum of the coordinates by another Wave Length factor and adding back the Elapsed Time, we can traverse the sine wave at different intervals.

This generates a far more natural-looking swaying motion. But to highlight a sense of wind direction, we want to amplify the movement one way more than the other. And a simple if statement can do the trick here. The final result still looks uniform. But we’re going to fix that, so keep watching.
Calculating Medium-Scale Motion
Currently, the plants move along a single vector specified by the wind direction with no deviations. Obviously, that’s not very realistic. Even in strong winds, plants tend to flap all over the place. So, we need to introduce some side-to-side motion without destroying the existing sense of wind direction. And that’s where our Medium-scale motion layer is going to enter the picture.
By creating two new sine wave functions for our X and Z axes, we can create motion that resembles a figure of eight. And just like before, we can replace Elapsed Time with our previously calculated Wind Factor variable to localise the movement. Now, if we combine our new Medium-Scale motion with the large-scale motion, we’re going to get closer to a decent-looking simulation. However, we’re still missing a few critical pieces of the puzzle.
Calculating Small-Scale Jitter
The purpose of implementing jitter is to emulate turbulence. When looking at the effect of wind on tree leaves, they have a habit of moving sporadically, in a motion more commonly known as rustling. As odd as it may sound, making a plant look as if it’s breathing can deliver this effect when combined with the previous layers of motion. So, to achieve this, we’re once again going to create a new sine function. But rather than moving the vertices along the wind direction, we’re going to move them along their normal vector instead.
The end result is a bit weird by itself. But when all three layers of motion are combined, things come together nicely. We’ve just got one more problem left to solve: uniformity.
Breaking It Up With Noise
Even with the adjustments made so far, there is an easily identifiable recurring pattern that continues to give our wind an artificial look. Fortunately, there’s a simple solution dating back to the 1980s – noise—three-dimensional Perlin noise, to be precise.
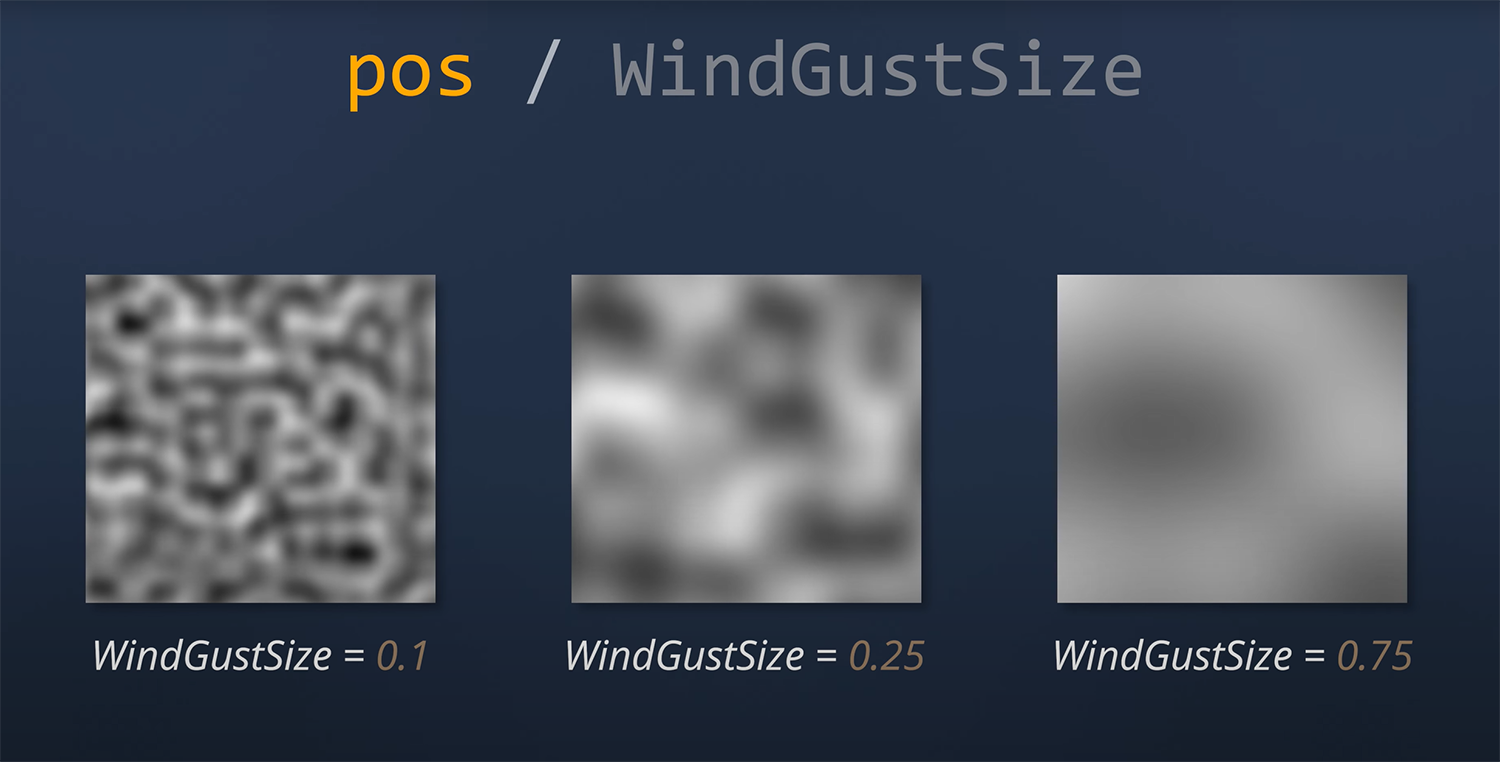
By feeding the X and Z world space coordinates of vertices as X and Y variables of the 3D Perlin Noise function, as well as the Elapsed Time as the Z variable, we end up with an animated noise texture that looks a bit like rumbling clouds.
Note that we’re also adjusting the world space position variables by a gust size factor. This is to help control the spacing between the “white” patches of the generated noise texture. And it’s going to help us break up the unwanted uniformity when we sample the noise texture as a strength factor.

We’re also going to modify the Elapsed Time value by adding a Gust Speed variable, which provides better control over the velocity at which the noise texture is animated. By the way, if you want the source code for the noise function, then keep watching until the end of the video.
All that’s left is to introduce the noise map to each layer of our wind simulation. Despite the relatively simple implementation, we can deliver high-quality results. And by introducing some randomness to the level of wind influence on each plant placement, the simulation can be improved even further.
Automated LOD Generation
Another critical feature of this plant generation toolkit is the addition of LODs. With impressive technologies like Nanite, LODs have become largely irrelevant for users of Unreal Engine.But for game developers using other platforms, creating a set of geometric detail levels for 3D assets is still a pivotal step during performance optimisation.
As a quick crash course, rendering 3D models in full detail when they are far away from the camera wastes a lot of computing power. So, to improve performance, game engines dynamically swap out high-detail assets with lower-detail versions at specified distances.
If executed well, players will be completely oblivious to this process. Unfortunately, it requires artists to spend time creating the different LODs for each 3D asset, which is a tedious and time-consuming process. That’s why Bright Life is going to automate the entire thing.
Thanks to the software’s distorted kitbashing system, which we explored in an earlier devlog, LODs for the individual components can be prepared ahead of time. These can also be passed through the same distortion algorithm, eliminating the risk of potential gaps in the mesh while keeping UV coordinates consistent between levels.
This also massively simplifies the LOD generation process since the individual components of a plant can be swapped out with their LOD counterparts. Subsequently, artists can now preview different LOD levels within the Bright Life editor from a drop-down list.
Exporting 3D Assets
Exporting a generated plant asset into a universal 3D format is relatively easy. In fact, there are plenty of libraries available to do this, and my Bright Engine SDK already has this functionality for the OBJ, FBX, Collada, and X3D formats. However, since the generated plants are built out of individual mesh components, directly exporting the asset without making some adjustments creates performance problems.
A generated 3D plant model could contain hundreds of individual meshes. This translates into more draw calls, resulting in a lower frame rate when imported into a game engine. To solve this, meshes sharing the same material need to be merged on export. The result is one mesh per material rather than one per component – a massive improvement.
We also need to adjust the vertex attributes to bake in the wind simulation data. The level of wind influence calculated in the plant generation stage can be stored in the red channel of a vertex colour attribute. That way, whenever the plant assets are dropped into another platform, the data can be accessed directly and seamlessly integrated with that platform’s wind simulation system.
Exporting Materials
Similar to exporting 3D assets, there are plenty of libraries available for writing texture files. And the Bright Engine SDK already supports exporting to industry-standard formats. However, unlike 3D assets, exporting materials is a bit more challenging.
Remember, artists can modify existing materials within Bright Life’s library, so these adjustments need to be exported as well. The solution is to loop through each pixel in a texture and modify it the same way as in the PBR shader.
However, doing this on the CPU will be exceptionally slow, even when taking advantage of multithreading. Fortunately, this sort of task is where GPUs shine. With thousands of cores available, a graphics card can make the necessary adjustments to the export textures blazingly fast. The only challenge is retrieving the image data back from the graphics card after its finished.
There are a few approaches to take. But the most straight forward is using framebuffers. In oversimplified terms, a framebuffer is a portion of memory that contains a specified texture along with other bits of data. We can create a new blank texture in memory to the exact resolution as our export texture and attach it to a new framebuffer.
We then bind this framebuffer, resize the OpenGL viewport to the same resolution, and draw a quad that fills the entire screen. Once the drawing process is complete, the texture attached to our frame buffer now holds the image data we want to export.
We can now easily query this data from the CPU and then write it out as an image in a file format of our choosing. This process is then repeated for each material texture selected by the artist. And finally once all materials have been exported, we resize the viewport back to default as well as rebind our default framebuffer.
Thanks to our second framebuffer, all of this magic happens off-screen. So, the only thing the artist sees is their exported materials.
Working Proof Of Concept
With wind simulation, LODs, and exporting all finished, Bright Life is officially a working proof of concept. However, there’s still a lot of work to do to get it production-ready. There are still plenty of features and improvements on the to-do list, not to mention the countless plant types and materials yet to be added to Bright Life’s generation system.
Needless to say, it’s going to take some time. But you can help accelerate this process by supporting Bright Life on Patreon today. For just $1, you’ll be able to download and use Bright Life right now. It’s also where you can find the source code for the 3D Perlin noise function, which can be accessed for free. There’s a link in the description below.
As always, let me know your thoughts in the comments. And remember to subscribe to get your free copy of Bright Life once it’s finished. Thanks again for watching, and I’ll see you in the next one.

Bright Life Devlog – Embracing PBR Materials and Rebuilding Quixel Megascans
NewsBright Life gets its own Quixel Megascans-inspired asset browser and a complete material customisation system.

Bright Life Devlog - Instantly Generating 3D Plant Models In One Click!
NewsA complete breakdown of how Bright Life's 3D mesh generation system was built and the challenges that came up along the way.

Bright Life Devlog – Building a Node Editor in .NET
NewsComplete breakdown of how Bright Life's node editor was created using WinForms .NET and Telerik and the challenges along the way.

Bright Life Devlog – Getting Started with UI, OpenGL & PBR
NewsBright Life starts to take shape with a new user interface, integration of OpenGL, and the core of the PBR rendering pipeline.


Will it cost ??
Right now, I haven't nailed down the monetisation strategy. However, one thing that's set in stone is the fact that all Subscribers on YouTube will be getting a copy of Bright Life for free once its finished. 👍